Vibration and Oil Analysis Techniques Reveal Root Cause Severity
By Ray Garvey, Emerson Process Management
When evaluating mechanical defects in roller elements and gears commonly found in rotating machinery, there are several techniques that can be applied to reveal root cause and severity. One is wear particle analysis using either a filter patch or glass slide. Another technique is a wear particle ferrous-density measurement method often referred to as ferrous index. A third technique is an impact-detecting vibration stress-wave analysis method called PeakVue®.
Each of these techniques independently provides insights as to the nature of a damage-causing mechanism, including abrasion, fatigue, boundary wear or corrosive wear. Root cause and severity information learned from these techniques can then guide operators to call for the best proactive and corrective actions. Uncorrected, these mechanisms will produce significant mechanical deterioration.
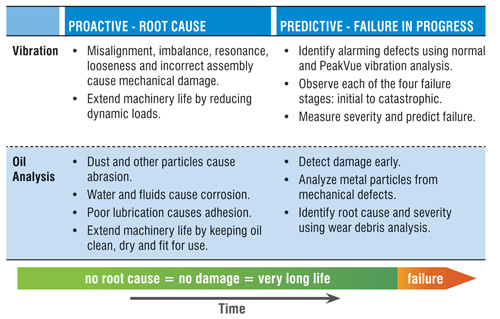
 Industrial plant maintenance departments typically use walk-around and on-line vibration analysis together with periodic oil analysis to determine condition-based maintenance on rotating machines like pumps, motors, compressors, gearboxes, turbines, fans and rolls. Figure 1 shows how vibration and oil analysis collectively address proactive condition monitoring by finding root causes before damage occurs, as well as by identifying component failures in progress, which might range from incipient to catastrophic.
PeakVue Technology
The PeakVue technology is a highly sensitive and trendable impact-detection method for quantifying defects in roller elements, bearing races and gear teeth. It is a unique stress-wave analysis technique distinguished from demodulation, shock pulse, spike energy and other peak detection methods in that PeakVue detects and holds a scalar maximum peak value from each oversampled plurality of sample values collected during each sample interval.

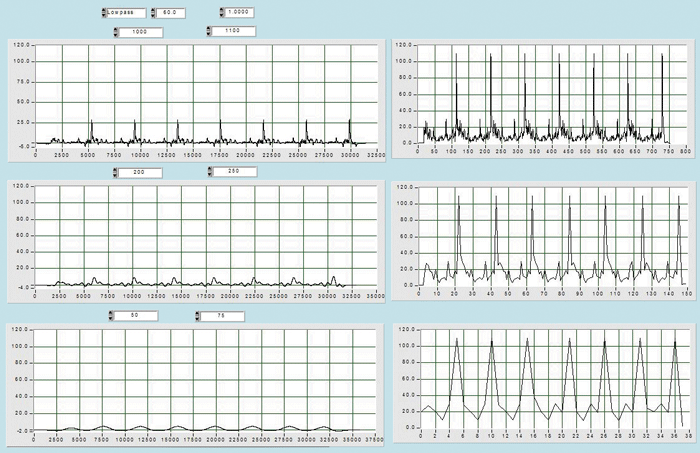
For example, Figure 2 is a comparison of demodulation with PeakVue in six different measurements of the same vibration signal having a periodic impact. The three plots on the left show how demodulation captures and represents only a small fraction of the total signal, so the portion detected is substantially diminished by the sampling bandwidth (1,000 hertz top, 200 hertz middle and 50 hertz bottom). The three plots on the right reveal how PeakVue captures and consistently represents the same data independent from bandwidth selection.
Ferrous Index for Ferrous Density
 Abnormal wear mechanisms of abrasion, fatigue, boundary wear or adhesion along with corrosion are common to rotating machinery such as gearboxes, pumps, motors, compressors, rolls, presses and transmissions. A ferrous-density measurement like ferrous index is an excellent method for detecting abnormal wear in the 5- to 60-micron size range. This is usually the result of abnormal fatigue caused by cyclic loading and boundary wear where lubrication is inadequate.
This ferrous-density measurement is highly sensitive to wear debris or dust contamination produced by abnormal abrasive wear. It is a measure of wear particles typically containing iron alloy particle debris in sizes as small as 5 microns and extending to at least 60 microns. This size range is frequently produced by abnormal severe sliding (boundary lubrication) wear or fatigue wear.
The ferrous index is defined in ASTM D7416 as a "ferrous-density-type parameter measuring the relative concentration and size of magnetically responsive iron particles greater than 5 microns collected on a dielectric-permittivity sensor."
Wear Particle Analysis
Wear particle analysis is a direct approach to visualizing damaging causes and effects taking place in lubricated machinery by capturing and viewing particles extracted from lubricating oil. ASTM D7684 is a new "Standard Guide for Microscopic Characterization of Particles from In-Service Lubricants." It provides excellent recommendations for terminology and techniques, such as filter patch analysis or analytical ferrography, and offers insight as to what is likely happening inside the rotating machine.
This new guide defines rolling contact fatigue wear as being "caused by loaded rolling contact typically between the roller and race in bearings or between gear teeth in the vicinity of the pitch line, typically forming spall-type pitting and releasing rolling contact fatigue particles." Rolling contact fatigue particles are described as "flat platelets, with a length more or less equal to their width, with smooth surfaces, random, jagged and irregularly shaped circumferences, and a major dimension-to-thickness ratio in the range of approximately 5:1 to 10:1 or more."
Emerson, Spectro Form Alliance
Alliance Emerson and Spectro Inc. recently announced an alliance to combine technical innovation and expertise to deliver best-in-class oil analysis solutions. By combining Emerson's oil analysis application for the process industry with Spectro's extensive oil analysis product line and expertise, users can gain more meaningful and accurate information on the condition of their machinery.
Under the new agreement, Spectro gains rights to a suite of Emerson-developed and patent-protected intellectual property in thefield of oil analysis for predictive machine maintenance. Included in this portfolio is Emerson's AMS Suite oil analysis software moduleas well as the CSI 5200 Machinery Health Oil Analyzer, which is part of the Trivector minilab package.
Effective Oct. 1, Spectro will become the exclusive worldwide supplier of the Spectro 5200 Minilab product and services offering. The onsite minilab is used to quickly test incoming and in-service lubricants with immediate retest when needed, enabling improved lubricant contamination control with effective root-cause detection and elimination.
Performing Ferrous Density and Wear Particle Analysis Onsite

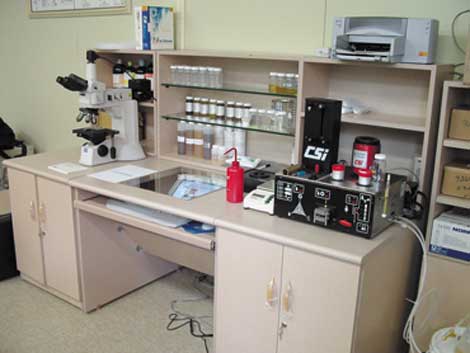
The onsite minilab shown in Figure 3 can be used to measure wear, contamination and chemistry parameters of lubricant samples, including ferrous index and wear particle analysis. Industrial plant maintenance departments employ onsite analytical tools like this to get immediate feedback with retest capability if needed.

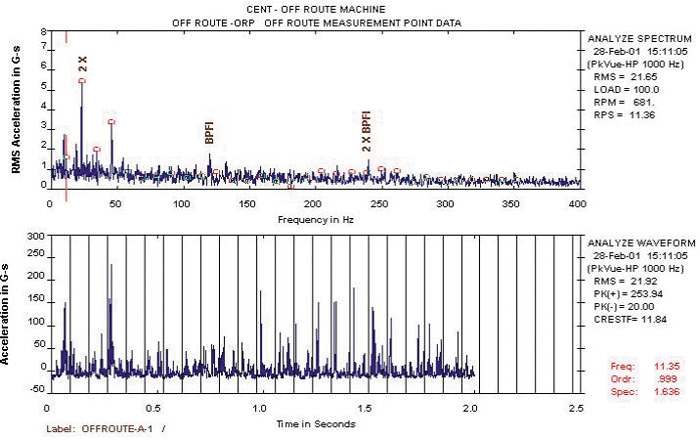
On the following page is an example of PeakVue and oil analysis, including wear particle analysis, combining for effective identification of root cause and severity. PeakVue data from a bearing pedestal is shown in Figure 4, while Figure 5 reveals wear particle analysis results from the same machine. Together, these technologies indicate a problem of inadequate lubrication.
In conclusion, vibration and oil analysis each provide valuable insights into the health of machine components and lubricant systems. The combination of PeakVue, ferrous density and wear particle analysis produce three independent perspectives into the root cause and severity of an anomalous condition. Armed with this information, predictive maintenance technicians are able to accurately recommend appropriate corrective actions in order to improve maintenance and plant reliability.
