Grease Analysis - Monitoring Grease Servicability and Bearing Condition
Approximately 90 percent of all bearings are lubricated with grease. But how much do you know about the grease or greased bearings in your plant? Grease analysis is certainly not for every bearing ... maybe it’s not even for most bearings. But when you have a need to know, a thorough analysis of the grease in question can prevent headaches and save money.
Historically, the analysis of grease has been confined to new grease testing for product acceptance and quality control. Technically, this was due to the sample size required to perform conventional ASTM (American Society of Testing and Materials) methods on grease samples. However, over the last couple of decades, new analytical methods have made it possible to profile the serviceability of grease using as few milligrams of sample as possible (0.00003527 of an ounce).
Sampling In-service Greases
The philosophical issues with sampling used greases are twofold. First, if the whole bearing must be sent to the lab just to get at the grease under the shield, what good is the analysis? Second, if you can get to the bearing grease without dismantling the bearing, is the sample reliable and representative of the condition of both the grease and the bearing?
These two problems are quite different. If a plant has hundreds of greased bearings that are so hard to get to that they must be removed and sent to the laboratory for grease analysis, the data obtained on a few bearings may need to be extrapolated across the entire bearing population to draw appropriate conclusions. An example of this might be to identify the root cause of a number of repeat bearing failures plant-wide. Experience shows that within a given application and environment, most of the failures, if they are lubrication-related, will stem from the same root cause. Therefore, it is worth the effort to take a group of bearings with varying service life and submit them for analysis. Once complete, the test results can be used to make an informed decision about grease selection, regreasing intervals, common wear mechanisms and typical cleanliness levels.
The second philosophical issue, that of whether the grease sample is truly representative, is slightly more complex to resolve. In this case, the technician needs to be aware of the differences in information that can be obtained from grease located at the bearings raceway interfaces, compared to grease that has been pushed out and is around the outside area of the housing, in much the same way as sample point location is vital when taking used oil samples. Generally, the grease sample of interest is the grease doing the work at the contact interfaces, in the load zone of the bearing. This grease sample will have the most evidence of wear, contamination and degradation and in general will be the most representative, although it will likely also be the most difficult to obtain.
Analyzing Used Grease Samples
Changes in Grease Consistency
Grease is made up of base oil, a gelling agent or soap thickener (sometimes called filler) and additives, which perform in much the same way as oil additives. The consistency of grease is controlled by the type and ratio of the gelling agent to the oil and its viscosity. Grease can harden or soften in service due to the effects of contamination, loss of oil or mechanical shearing.
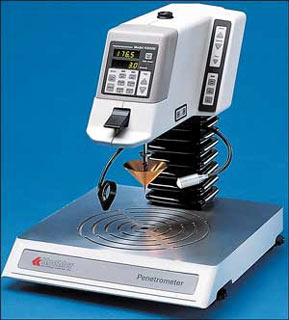
 The classic way in which the consistency of a grease is measured is using the cone penetration test (ASTM D217). In this test, the grease is heated to 25°C (77°F) and placed below the tip of the test cone, as shown in Figure 1.
The cone is allowed to drop into the grease; the amount of penetration is measured by the penetrometer in tenths of a millimeter. The greater the penetration, the thinner the grease consistency. The test is often repeated after “working” the grease to replicate the effects of mechanical shearing. In fact, worked penetration of new greases is the property upon which the NLGI (National Lubricating Grease Institute) grease consistency classification system is based, as shown in Table 1.
| NLGI Number | Worked Penetration mm | Description of Consistency |
|---|---|---|
| 000 | 445-475 | Semi-liquid |
| 00 | 400-430 | — |
| 0 | 355-385 | Viscous Liquid |
| 1 | 310-340 | — |
| 2 | 265-295 | Will Flow |
| 3 | — | 200-250 |
| 4 | 175-205 | Resist Flow |
| 5 | 130-160 | — |
| 6 | 85-115 | Hard and wax like |
Cone penetration using ASTM D217 requires a large volume of sample and is not normally performed on used grease samples. An alternative method, ASTM D1403 uses ¼ or ½ the sample volume of ASTM D217 making it more amenable to used grease analysis.
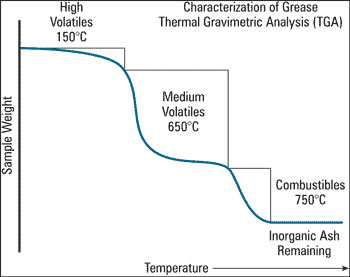
 A more modern alternative to cone penetration, for estimating changes in the consistency of used greases is Thermal Gravimetric Analysis (TGA). TGA analysis measures the mass of a substance in relationship to temperature and is used to determine the loss of material with increasing temperature. The analysis can be carried out in an inert atmosphere such as nitrogen or a reactive atmosphere such as oxygen. Typically, a few milligrams of the sample is weighed and heated under controlled conditions. The weight loss at specific temperatures allows the technician to evaluate the oil/gelling agent ratio as compared to new (unused grease), as well as the presence of volatile compounds such as water, allowing any significant change in gelling agent chemistry to be determined (Figure 2).
Antioxidant Levels in Grease
Greases, like oils, contain a variety of additives. Antioxidant levels are of particular interest in identifying the useful life of the grease. Differential Scanning Calorimetry (DSC) is a modern analytical method for measuring the onset of oxidation in used grease (ASTM D5483). When compared to the new reference grease, the test can be used to determine the remaining useful life (RUL) of a grease. This test is analogous in the information it seeks, if not in methodology, to the RPVOT test commonly used to determine the RUL of turbine oils and other lubricating oils.
DSC works by placing a sample of used grease into a test cell. The cell is heated and pressurized with oxygen. When the grease starts to oxidize, an exothermic reaction occurs, which liberates heat. By measuring the onset of the reaction in the used grease (commonly called the induction point) in reference to the new grease, an estimate of the oxidation stability of the grease can be made (Figure 3).
Viscosity of Grease
The viscosity of grease is often misunderstood. The viscosity typically listed on a new oil data sheet is usually the kinematic viscosity of the oil used in blending the grease measured, using the standard ASTM D445 method. The kinematic viscosity of the base oil is important in ensuring the correct grease, containing the correct grade of oil is used for lubrication purposes. However, we can also measure the viscosity of the grease itself. Since a grease is non-Newtonian, we can only measure the apparent viscosity because the viscosity of a non-Newtonian fluid changes with shear stress (see “Understanding Absolute and Kinematic Viscosity” by Drew Troyer). The apparent viscosity of a grease is determined using ASTM D1092. This test measures the force required to force the grease through an orifice under pressure. As such, this test is an ideal way of determining the flow characteristics of grease through pipes, lines, dispensing equipment as well as its pumpability.
Rheology measurements of grease may soon replace both the cone penetration and the apparent viscosity measurements. Rheology is the study of the deformation and/or flow of matter when it is subjected to strain, temperature and time. A rheometer only requires a few grams of sample to perform the analysis, yielding much more information than the cone penetration or the apparent viscosity measurements. This makes the rheology measurement an ideal test for small amounts of used grease.
Dropping Point
The dropping point of a grease is the temperature at which the grease changes from semi-solid to a liquid. The dropping point establishes the maximum useable temperature of the grease, which is typically set at 50°C to 100 °C below the experimentally determined dropping point. Dropping point can help to establish if the correct grease was supplied or is in use, and to determine if a used grease is good for continued service.
Contamination of Used Grease
Many bearings fail prematurely due to contamination. Grease contamination can come not only from common environmental contaminants such as dirt and water, but also cross-contamination from other grease types. This is a major issue with greases because many gelling agents are incompatible, resulting in either a significant change in consistency (either thicker or thinner), or a separation of the oil from the gelling agent. There are a number of ways to determine the presence of contaminants in a used grease sample.
Contamination from water or other grease types can be identified by Fourier Transform Infrared Spectroscopy (FTIR) Analysis (Figure 4). FTIR can also measure gelling agent type and concentration, along with oxidation by-products.
If cross-contamination with different types of grease is suspected, it may also be feasible to perform elemental analysis (after acid digestion) to look for common metals present in the gelling agent. For example, a grease that is supposed to be an aluminum complex grease, but has become contaminated with a calcium sulfonate complex grease will show both aluminum and calcium in spectroscopic analysis, indicating a contamination problem.
Alert and Alarm Management Methods
The methods for establishing criteria, and methods for alert and alarm values vary according to the experience of the user. Alert values are those considered to be above or below the norm, while alarm values are those beyond a safe operating level. One of the primary concerns in establishing a new database is setting the criteria at a level that will alert the operator to a change in the machine or lubricant, give that operator enough advance warning to make a timely decision, yet realistic enough so that premature alerts do not occur.
Absolute Values
Absolute values, also referred to as fixed or hard number, may be assigned to any characteristic. These values are based on the equipment type and grease type and grade. In some cases, fixed values may be obtained from the original equipment manufacturer. In cases where there are no recommended values, the fixed limit may be set using the experience of the laboratory with the specific lubricant and machine combination. It is important to remember that hard number alert values are a place to start a program, which contain many unknown factors.
During the initial phase of the program, it is not uncommon for the alarm values to remain unchanged and invalidated for a substantial period of time. If the alarm value set is not appropriate for the machine in its unique configuration, the risk of machine failure remains higher than acceptable.
Percent Change
For some tests, such as oil versus gelling agent, it is more appropriate to set values on a percentage change rather than standard deviation. An advantage of this type of alert is that it does not require valid statistical populations if the baseline is considered. Many percentage alarms can be converted to absolutes when the baseline value is a known quantity or the test has published typical values.
Statistical Analysis
Statistical analysis of wear metals is effective on mature databases. This requires a statistically valid population (typically 30 data points or more); therefore, it is normally based on like equipment in a group rather than a single piece of equipment. Once sufficient historical data for the single machine is available, statistical analysis may be applied to the machine alone.
Trend Performance or Rate of Rise
 Setting alert values based on the rate of rise of the data, or on the slope of the curve, for a specific wear metal above a predetermined minimum threshold value can be accomplished after the initial three sets of data are entered into the database. The logic behind the three histories is simply that it takes a minimum of three points to calculate a curve. While this can provide additional information to the analyst, it relies heavily on obtaining correct and consistent operating time values, normally hours. It is also more likely to be invalidated by other variables such as inconsistent sampling techniques.
Setting Limits
 In the sample seen in Table 1, it is easy to see which of the samples have high iron, aluminum, copper and silicon. The alarms set are based on 18 samples from various parts inside of a bearing cavity from different wheel bearings. Many times (as in this case) a data evaluator must make an initial judgment about what is considered normal. After sorting the data set by iron, it is clear there is a break at 144 ppm. Considering all of the samples lower than 144 ppm of iron as normal, the basis for the analysis is established.
- OK Samples: The average (Avg.) of all normal data is added to the standard deviation (STDEV) of all normal data. These samples are considered OK.
- Abnormal Samples: Two times the STDEV of all normal samples plus the Avg. These samples are considered ALERT.
- Critical Samples: Three times the STDEV of all normal samples plus the Avg. These samples are considered ALARM.
Measuring Low Concentration of Water
FTIR can identify the presence of water. However, it is not sensitive to low levels. Water in the parts-per-million (ppm) range can be measured using a variation of ASTM D6304 - Standard Method for Determination of Water in Petroleum Products, Lubricating Oils, and Additives by Coulometric Karl Fischer Titration. This method allows for the distillation of water using a distillation tower at 120°C (248°F) into a titration vessel where it is solublized in toluene and sparged with nitrogen. The toluene/water mixture is then titrated using Karl Fischer Reagent as per ASTM D 6304. The levels of detection using this method are in the low ppm range.
Wear Debris and Particle Contamination
Conventional methods for measuring wear debris are ferrographic analysis and elemental analysis. While the quantitative estimation of wear debris is difficult in a used grease sample using elemental analysis, because of the difficulties of obtaining a representative sample, ferrographic analysis, which by its very nature is a qualitative technique, is ideal in determining the active wear mechanism and severity of the problem in grease lubricated bearings.
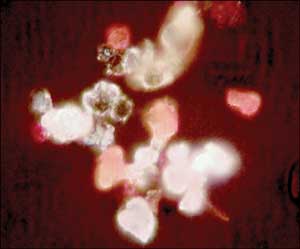
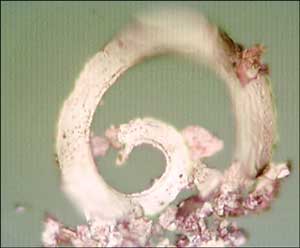
Ferrographic analysis on used greases is carried out by extracting the wear debris from the sample and analyzing it visually using an optical microscope, in a way similar to how ferrography is used for used oil samples (Figure 5).
Figure 5. Ferrographic Analysis (top) Shows a Large Concentration of Abrasive Silica in the Grease. The Ferrogram on the bottom Shows Severe Cutting Wear. This Information Helps Identify the Root Cause of Premature Bearing Failures.
By looking at particle morphology, it is often possible with ferrographic analysis to identify the root cause of premature bearing failures to be determined, allowing appropriate corrective action to be taken.
Modern methods of analysis for used grease samples are rapid, sophisticated and require only a fraction of the sample volume necessary in the past. Sound, cost-saving, maintenance decisions can be made using grease analysis as the basis for preventive and predictive programs.
