Anatomy of a Representative Oil Sample: Part 1 - Sample Bottles
The decision to perform oil sampling can be difficult. You must consider whether to spend the extra time to take a sample and the extra money for oil analysis. Once the decision is made, it is critical to understand how to maximize the data’s value and minimize any disturbance that could render the sample useless.
No matter how much attention is paid to an oil sample or how effective the laboratory equipment is, the results are meaningless if the sample is not representative of the system’s fluid. While this may appear to be common sense, more thought is usually given to the lab or the oil analysis results than the techniques and equipment used in the sampling process.
Advanced Sample Bottles
 In recent years, new methods have focused on enhancing sample bottles to improve not only their ease of use but also their ability to obtain a representative sample. One such example is the UCVD (Ultra Clean Vacuum Device), which was invented and developed by Giuseppe Adriani of Mecoil Diagnosi Meccaniche. Known as the SureSample through its U.S. distributor, Analysts Inc., this advanced bottle is designed to hold a pre-established vacuum. With the vacuum intact during distribution, the bottle is nearly void of all moisture and contaminants at an ultraclean level. Once the bottle’s nozzle is attached to a sample tube and the other end inserted into a sample port, the nozzle is switched, allowing the vacuum to independently draw fluid into the bottle to the required level. This action is possible for nearly all viscosities, with higher viscosity fluids only requiring longer draw times. This method also may eliminate the need for a manual vacuum pump during sampling from any lubricating system, even non-pressurized systems. Thus, a sampling technician potentially could have numerous samples drawing into multiple bottles at the same time while being confident that the samples aren’t being contaminated in the process.
This article is the sixth installment of a series of “anatomy” lessons within Machinery Lubrication. In this issue, the importance of oil sample bottles in obtaining a representative sample will be discussed. Subsequent articles will address proper sampling equipment, selecting a sampling valve and choosing the best sampling location.
It has often been said that particles too small to be seen by the unaided eye are the most destructive in three-body abrasive wear. These particles, which are typically in the 5- to 15-micron range, have the capability of getting trapped between surface gaps rather than shooting through the gap or being held outside the gap. For this reason, particle contamination analysis commonly presents data as three range numbers for particles greater than 4, 6 and 14 microns.
Given that these “invisible” particles are substantial, it is imperative to ensure that they are not present within the sample bottle prior to a sample being obtained. This means that drawing a sample into a washed-out soda bottle will not be good enough. Even a sample bottle purchased with the lid and bottle in separate packages will not be sufficient.
Sample Bottle Cleanliness
Rather than using the closest “bottle” you can find or purchasing the cheapest sample bottles on the market, consider the cleanliness levels of sample bottles established specifically for this purpose. The required sample bottle cleanliness will be based on the importance of the sample being taken and the sensitivity of the tests being conducted.

One method of classifying sample bottle cleanliness provides three categories for specifying the range of particles in a bottle. “Clean” oil sample bottles are defined as having less than 100 particles greater than 10 microns per milliliter of fluid. This cleanliness level is the most common and least expensive. “Superclean” oil sample bottles can be defined as having less than 10 particles greater than 10 microns per milliliter of fluid. “Ultraclean” oil sample bottles are defined as having less than 1 particle greater than 10 microns per milliliter of fluid. ISO 3722 also describes a certification procedure based on randomized testing for cleanliness.
Sample Bottle Material and Size
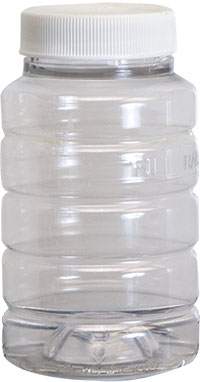
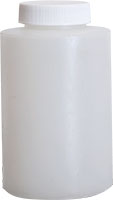
Oil sample bottles are available in a few standard materials, namely plastic or glass. The material should be selected based on the type of fluid sampled and the cleanliness requirements. The most common sample bottles are high-density polyethylene (HDPE) or polyethylene terephthalate (PET). HDPE is opaque, which may be its main disadvantage. Not having the ability to clearly see the oil in the bottle prevents visual onsite analysis, which can be helpful in detecting water or heavy particle contamination. On the other hand, PET is clear but generally not suitable for samples at temperatures higher than 200 degrees F. Nevertheless, it has greater compatibility with most industrial lubricants. Compared to glass bottles, both polyethylene-based bottles are fairly inexpensive. However, glass bottles offer the benefits of excellent cleanliness levels and lubricant compatibility.
| Use | Volume | Material | ISO Cleanliness * | Cost | |
|---|---|---|---|---|---|
 |
General oil sampling, visual analysis | 3 and 4 ounces (100 to 120 milliliters) | PET (transparent) | Superclean | $ |
| |
General oil sampling | 3 and 4 ounces (100 to 120 milliliters) | HDPE (opaque) | Clean to Superclean | $ |
 |
Hydraulic Fluid | 4 and 8 ounces (100 to 200 milliliters) | HDPE/PET (transparent or opaque) | Clean to Superclean | $$ |
| |
Hydraulic Fluid, Visual Analysis | 4 and 8 ounces (100 to 200 milliliters) | Glass (transparent) | Ultraclean | $$$ |
| * Cleanliness levels shown are of typical availability and will depend on the bottle distributor. | |||||
Oil Sample Bottle Types
The sample bottle size should be based on the type of sample fluid as well as the number and type of tests to be conducted. For most standard oil analysis tests, oil samples are taken in a 100- or 120-milliliter bottle. For advanced or exception tests, a 200-milliliter or larger bottle may be required, although bottles larger than 200 milliliters tend to be used for fuel analysis. An example of when a larger sample might be necessary would be for hydraulic fluid testing, especially aviation hydraulic fluid. Sample bottles can also come in smaller sizes for other applications. A breakdown of various types of oil sample bottles is shown in the chart above.
 When choosing an oil sample bottle, first talk to your oil analysis laboratory. Ask if the lab provides/recommends sample bottles. In addition, find out if the bottles are subjected to testing, as per ISO 3722. You then must establish the cleanliness requirements for your samples. One way to determine the necessary sample bottle cleanliness is to use the signal-to-noise ratio (SNR) technique. As the formula on page 45 indicates, the SNR is defined as the target cleanliness for the machine divided by the contamination identified for the bottle.
The goal is a higher SNR value. For example, an SNR of 5 would have a 20-percent variance of cleanliness accuracy, while an SNR of 10 would have a 10-percent variance. A higher SNR is achievable with fluids like gear oil that don’t require rigorous cleanliness levels. Fluids with greater cleanliness requirements, such as hydraulic fluid, demand cleaner sample bottles to help achieve an SNR value above 5.
Sample Collection
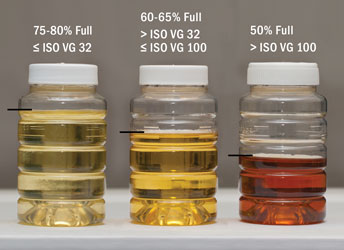
When a sample is taken, it is critical to know how much fluid should be drawn into the bottle. However, it may be more important to understand how much headspace or ullage is remaining in the bottle. This will help the laboratory perform proper agitation before testing. The amount of ullage required will depend on the fluid’s viscosity, as more viscous fluids need more room to agitate sufficiently.

Other factors in obtaining a representative oil sample will be discussed in upcoming issues of Machinery Lubrication, including optimum sample extraction tools, sample location and sampling intervals, as well as best practices for taking a sample based on the machine type. Remember, if one aspect of the sampling process is neglected, the oil analysis results are at risk of becoming meaningless. Therefore, it is essential to maximize the data’s value. This follows the three common objectives of oil sampling, which are to maximize data density, minimize data disturbance and establish a proper frequency. Appropriate sample bottles are just one element that can help you achieve these objectives and enable you to obtain a highly representative oil sample. In return, not only will you be more confident in the oil analysis results, but the sampling procedure will be easier than ever before.
