Why One Oil Sampling Point Isn't Always Enough
The starting point of any great oil analysis program begins with obtaining representative samples. The goal of sampling is to maximize data density while minimizing data disturbance. You maximize data density by sampling in the right location with the right equipment at the right time. Often, the right location is a “live zone” within the machine where oil is flowing in a turbulent manner. This allows you to capture a sample containing all the useful information needed for trending without losing any data via particle fly-by or settling. The right equipment includes the use of minimess sampling valves, vacuum sampling pumps, disposable tubing and other accessories for taking samples as cleanly as possible. Depending on the criticality of the machine or how poorly it is operating, the sampling frequency may be very long (every six months) or very short (every two weeks). Drawing consistent samples helps to trend wear debris, contamination levels and lubricant health.
Minimizing data disturbance depends on how well the sample extraction process is designed. A common mistake is failing to flush the sample equipment as part of the procedure for drawing a sample. If you are using disposable tubing and a vacuum sampling device, the tubing must be flushed to get a true representative sample. Flushing between five to 10 times the dead volume from all sampling equipment is recommended. This ensures that any contaminants inside the tubing are cleared out and that the sample will be representative of the conditions inside the machine.

Using the proper cleanliness specifications on the sample bottles will also help reduce the signal-to-noise ratio that can skew particle counting efforts. If you put oil into a dirty sample bottle, the results will show that the oil in the system is dirty when that isn’t necessarily true. Make certain that sample bottles are cleaned to the specifications required to hit your target cleanliness goals. If you receive sample bottles from a laboratory, call them and ask what quality-control process they have in place for the bottles and if they are certified to a specific cleanliness standard.
Choosing the correct sample location can be challenging. When I’m in a plant and am asked where to install a sample port, I look for a single spot where I can gather as much useful data about the entire system. This is called the primary sampling location. At this location, the goal is to be able to draw a single sample that acts as a snapshot of the entire system. In most circulating systems, this will be on the main return line before the reservoir. By sampling from this one spot, you can check the wear debris from the rest of the system as well as the particle count to get an idea of the total contaminants in the system.
Although the primary sampling location is a great place to start, it often leaves behind a lot of valuable data. This is why secondary sampling locations should be installed on most systems. The goal of a secondary location is to be able to pinpoint the cause of any fault seen on an oil analysis report. Unlike the primary port, which provides an overall look at the entire machine, secondary ports enable you to focus on individual components inside the system.
Primary vs. Secondary Sampling Ports
Primary sampling ports/valves should be properly located and installed at the factory, and provide an overall look at the entire machine.
Secondary sampling ports/valves should be installed on many circulating systems and enable you to focus on individual components inside a system.
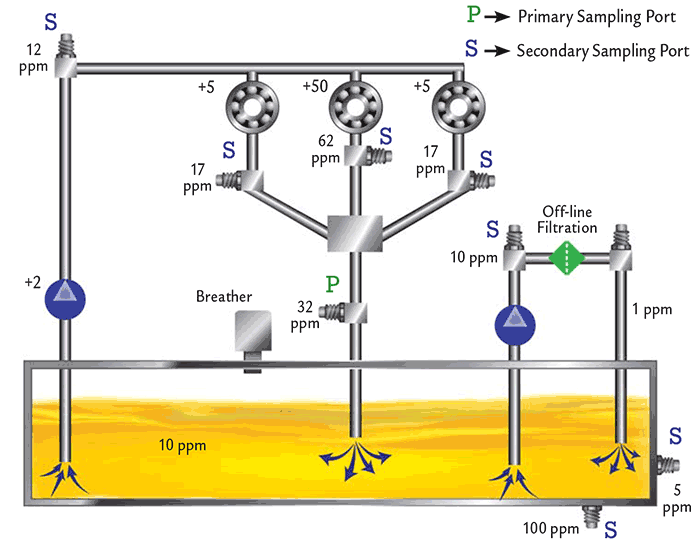
Most circulating and hydraulic systems should have both a primary and secondary sampling location to ensure that any identified failure mechanism can be tracked back to the component causing the problem. Not only can a secondary port be used to help determine the source of wear debris or particles, but by installing sampling ports behind filters, you can monitor how well the filter is removing particles. So while the primary port may get the most use, the secondary port is invaluable once a fault has been detected.
In the circulating system shown above, the primary sampling port is on the main return line before the reservoir. This is a great location, as the entire system can be actively monitored from this single port. In looking through the circuit, you will see secondary sampling ports after each component in the system. This can be quite useful. For example, it was determined through research and historical information that whenever the system exceeds 22 parts per million (ppm) of metal at the primary port, there is a problem with the system. The last sample taken indicated 32 ppm metal. Without secondary ports, there would be no way of knowing where the additional metal was originating. However, the engineer was wise and installed secondary ports throughout the system. By sampling at each location, it became apparent that the middle bearing was the one causing the high wear metal count.
This illustration provides an excellent case in point for why secondary ports are needed. Remember, even though sampling can be a great predictive maintenance tool, a single sample port may not always be adequate for diagnosing abnormal conditions inside a machine.
