Blotter Spot Testing for Metallic and Other Solid Particles
The blotter spot test has been discussed numerous times in the pages of Machinery Lubrication magazine. It not only is one of the oldest oil analysis tests (mid-19th century) but endures as one of the most effective at detecting and even quantifying certain lubricant abnormalities. However, the blotter spot test is not commonly known as a test for detecting and examining particles in oil such as wear debris and dirt.
As a practical matter, its ability to reveal normal and even slightly abnormal amounts of solid particles is limited, especially without the aid of a microscope. This generally is true with other applications of blotter spot testing. In other words, the lack of a visible structure (rings, starbursts, pasty center, etc.) is an indication of the absence of the target condition. Because of this, the blotter spot test is less likely to produce a false negative compared to other more advanced analytical methods.
While each method has its own unique interferences and lower sensitivity limits, the ability of blotter spot testing to provide a reliable alert to abnormal particle concentrations is undisputable. Of course, this depends on the alarm limit. Such particles would be invisible in the oil as viewed with the unaided eye. Other methods such as patch testing, ferrography, particle counting and elemental analysis (for small particles only) could detect particles in this same range of concentration and particle type.

Particle Mobility on Blotters
Soot, oxides and other resinous (soft) insolubles in certain oils exhibit a degree of mobility (particle travel) outward in a radial direction from where the oil is introduced to the blotter paper. This can leave a recognizable structure on the blotter. Conversely, hard inorganic particles such as wear debris and dirt do not wick out into the blotter paper well, with the exception of the smallest particles (e.g., less than 3 microns). This is due to the high relative density of these particles and their larger size.
Large particles settle quickly and are entrapped by the tortuous texture of the blotter media. Small particles and those of low density can be more easily transported radially by the oil. The distance of their travel is dependent on the particles’ size, density and shape, along with the viscosity and density of the oil in which they are suspended. Other influencing factors include the type of blotter paper, particle polarity, certain additives (e.g., dispersants) and temperature of the oil (when introduced), as well as whether the blotter is developed using a hot plate.
The limited mobility of particles is a good thing when their population in the oil is relatively low. This is because they will deposit in a concentrated zone, in the center of the blotter, providing more conspicuous viewing. This feature is more of a negative when particle concentrations are high, as they tend to pile on top of each other, which can obscure the view of some large particles.

Examining Blotter Spot Particle Deposits
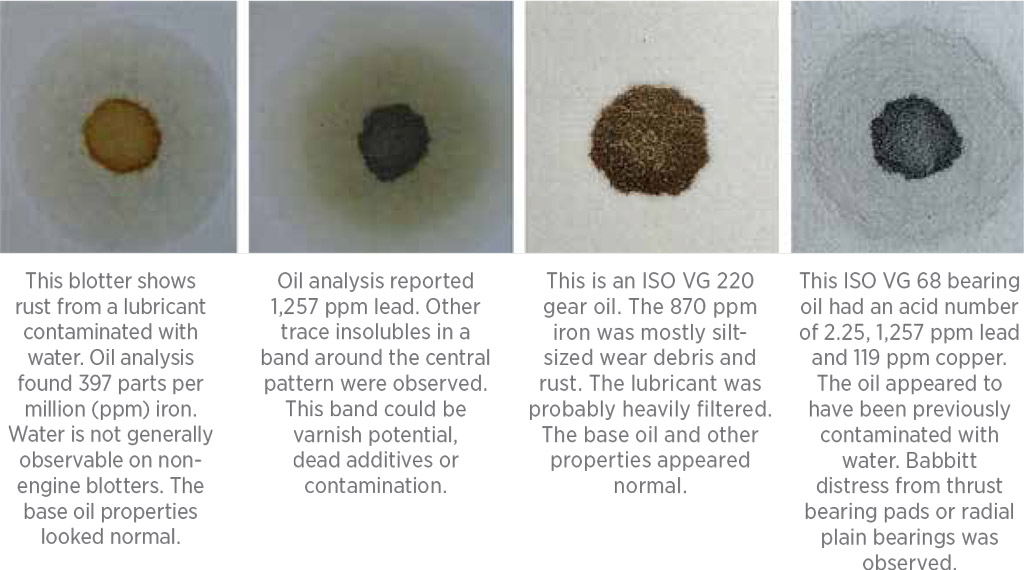
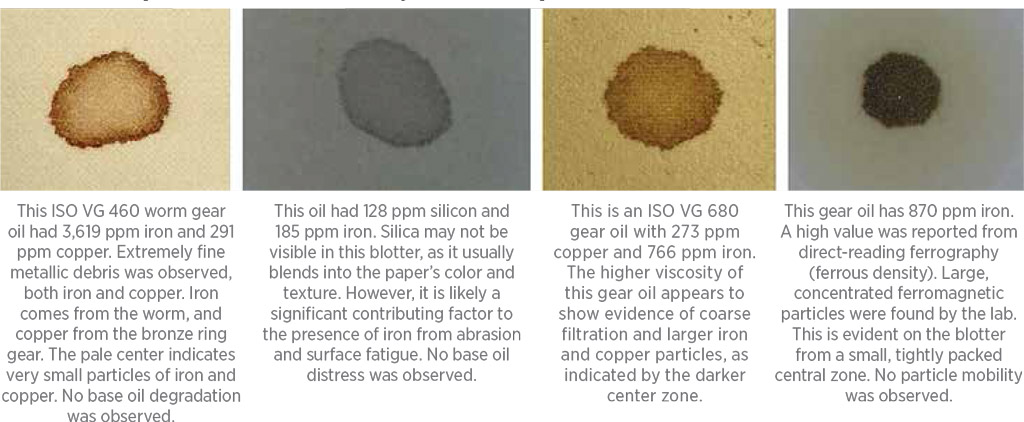
The nature of solid particle deposits can be observed in the blotter samples shown below. These particles, which are basically sediment, are largely constrained in the central deposit zone and slightly at the halo region of its periphery. In most cases, the central zone is deeply colored with a dense debris field, similar to what you might see in a patch test. In a few other instances, the core region of the central zone is distinctly paler, but the color may graduate to darker tones toward the halo periphery.
The color transitions suggest some particle mobility and that most of the particles are quite small (less than 3 microns). This can occur when the larger particles are selectively stripped from the oil by sump stratification (sediment) or filtration (in circulating systems). When oil is changed infrequently, there can be a considerable buildup of small particles, often called ghost riders. For more on this subject, please refer to my article in the July-August 2018 issue of Machinery Lubrication.
The blotters shown are mostly from industrial gear and bearing oils exhibiting abnormal levels of wear metals. All blotter images are roughly the same size as when they were created, i.e., no magnification. Interpretation of these blotters is always subjective and influenced heavily by the experience of the analyst, knowledge of the machine and operating conditions/exposures, and the ability to trend from a succession of previous blotters (same machine) or from blotters from similar machines.
Note the elemental data on the oils used in the blotters shown. Be mindful that elemental analysis is largely unable to quantify the presence of particles larger than 3 microns. Conversely, these larger particles are quite visible on the blotter, especially aided by microscopy. Other tests and inspections can also aid considerably in the interpretation, including patch testing, magnetic plugs, bottom sediment and water (BS&W), used filter inspections, ferrous density testing, secondary oil sample inspections, vibration, acoustic emissions and thermal imaging.
Like most condition monitoring methods, blotter spot testing adds information or data to help answer questions about machine health and lubricant condition. It can provide an effective screen for numerous conditions or potential alerts. In many cases, it must be combined with other methods to enable a more complete characterization of condition and health. Despite its low-tech simplicity, it should never be ignored or underestimated in terms of importance to the field of condition monitoring and machine reliability.
How the Blotter Spot Test Is Performed
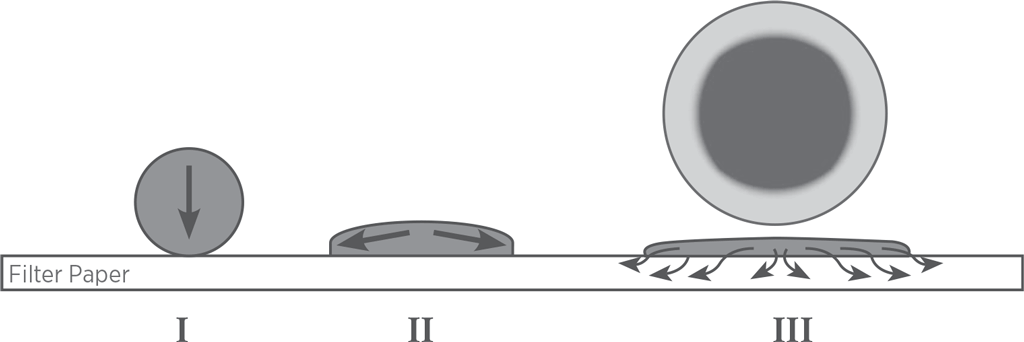
To perform the blotter spot test, sample the oil from an active live zone of the system, similar to conventional oil analysis. Next, using a disposable laboratory syringe, place a couple drops of oil in the center of the blotter paper (see the illustration below). The oil should not be too hot, as many of the target components become insoluble at lower temperatures and only then can contribute to the blotter’s structure. Room temperature is best. If trending is performed, the blotters should be developed at roughly the same temperature. When trending, the current blotter is compared to blotters from previous samples.
Allow the paper to sit in a horizontal position, such as on the rim of a beaker or drinking glass. Don’t lay the card flat in direct contact with a table top or other flat surface, as this contact will interfere with the development of the structure.
Next, let the oil develop or wick radially into the paper, creating a structured blotter spread. It will absorb outward from where the oil drops were applied by capillary action. The rate of absorptive movement and total travel is influenced by many physical (e.g., viscosity) and chemical (e.g., polarity) properties, including temperature. Typically, after an hour or so, the blotter is ready to be examined. Note that some blotters will continue to move even days later. For this reason, use a standard time interval, especially if images are taken for future comparison.

