Best Practices for Storing and Using Grease Guns
I recently moved across town. During the process of unpacking the truck, I quickly was reminded of the value of organization and how no two boxes are created equal. This also made me think about the importance of best practices as they relate to the storage, use and handling of grease guns.
Properly storing your grease and grease guns is vital to achieving longevity from your lubricant. It is also essential to keep all your lubricants clean, cool and dry, with cleanliness often the most difficult to accomplish. Have you ever tried to remove solid particles from a tube of grease? It is almost impossible without introducing more contaminants.
How to Store Greases and Grease Guns
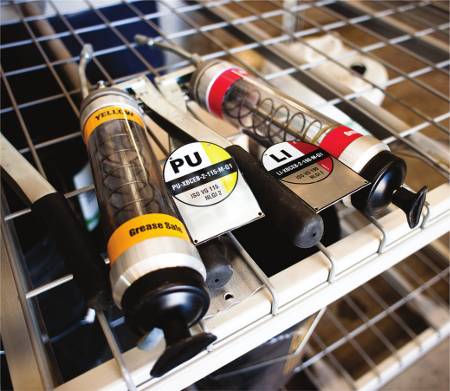
 So, regardless of where your grease is stored, such as in a tube, keg or grease gun, how do you keep your grease clean? The best practice to maintain a clean grease gun is to hang it horizontally inside a clean, fireproof cabinet with the plunger disengaged from the tube. Grease guns should be stored horizontally to avoid two potential problems.
First, you don’t want to overexert the spring and plunger, as this will cause the grease gun to wear quicker and change the amount of lubricant it exerts on each pump. Secondly, if there is a tube of grease inside the gun and the base oil begins to bleed out of the thickener, you would prefer that base oil be evenly distributed inside the tube. This will help prevent you from just pumping thickener into your machine.
Once a grease gun is no longer working properly or has become too dirty to clean, throw it away immediately. The longer it stays around the plant, the more likely it will be put back into service. Taking pride in the cleanliness of your lubrication equipment is infectious and puts everyone on notice that you take your job seriously and are dedicated to doing what it takes to keep your lubricants clean and ultimately the machines running reliably.
If you purchase grease in kegs, it is critical to keep the lid on the keg at all times when not refilling a grease gun. Kegs should also be stored inside a clean cabinet. When you refill a grease gun, ensure the plunger and outside of the gun are clean. If they are not, you will be introducing more contaminants into the keg.
Finally, if you buy your grease in tubes, be sure to store them vertically with the removable seal on top and preferably inside the original box in which they were delivered. Having the seal on top helps to prevent oil leakage in the event the base oil separates from the thickener. Grease tubes should be stored inside a clean cabinet as well.
Now that you know how to keep grease clean, how can you make certain that it stays cool and dry while in storage? The simplest answer is to store your cabinets inside a climate-controlled room. It is not enough to simply maintain an air temperature of approximately 70 degrees. You also want to limit the amount of moisture in the room. Two of the top oxidation accelerators are water and heat. By controlling these two factors, you can significantly extend the life of your lubricants.
Just like my moving boxes, all greases are not created equal. It is important to mark the date when your greases were received and when they will expire. The expiration date will vary depending on the thickener. For example, lithium grease is often identified as having a 12-month shelf life, while calcium-complex greases may have a shelf life of just six months - and this is under good storage conditions.
Some people may wonder whether they need to label their greases in storage, since the product names are already on the boxes. The answer is yes, you should. The goal of labeling lubricants in your plant is to have everything and everywhere a lubricant is stored, transported or applied be identified with a label that is unique to that specific lubricant.
The label should at least include the product name or lubricant identification system (LIS) code, as well as a unique color and shape. As technology continues to advance, you may also add a barcode or radio-frequency identification (RFID) tag to prevent accidental cross-contamination.
While grease is in storage, the best way to identify it is to label the shelf where the grease or grease gun is to be stored. It also is a good idea to have a picture of what the contents of the cabinet should look like. This will help set the expectation for all personnel who open the cabinet.
How to Handle Grease Guns
Grease guns should be treated with care. Although some may be inexpensive in comparison to other equipment, they are still precision instruments. When calculating how much grease to apply, remember that the amount can be reported in either ounces or grams.
The lubrication technician must convert the number of pumps into volume. Just as not all greases are created equal, the same can be said for grease guns. This goes beyond simply the model and manufacturer. Therefore, the volume per pump must be determined for each individual grease gun.
The best way to calibrate a grease gun is to slowly pump 10 strokes of grease onto a postal scale and then divide the total volume by 10. This will yield the average volume per pump of the grease gun. Each grease gun should also be dedicated to a single grease.
This will significantly reduce the amount of cross-contamination. Be sure to place a label on the grease gun with the date it was calibrated and the average volume dispensed per pump. Grease guns should be calibrated before being placed into service and every 12 months after being put into service.
There are many grease gun options on the market. Choose the ones that will work best for your plant and personnel. Regardless of the model you purchase, each grease gun should be labeled to indicate the lubricant to which it is dedicated. If possible, it also is recommended that the grease gun’s barrel be clear. This will allow you to visually check whether the correct grease tube is in the gun before you apply lubricant to your equipment.
How to Properly Use a Grease Gun
 Now that you know how to store and handle your grease guns, the real work begins. How do you get the grease from the grease gun into your equipment? This will require attention to detail. If you skip one step in the process, you risk introducing contaminants and overgreasing or undergreasing your equipment.
First, verify that you are at the correct lube point, have the correct grease and grease gun in hand, and that the equipment is in the proper operating state (running or shut down) to safely perform the procedure. Next, calculate the maximum number of pumps to apply by dividing the regreasing volume by the average volume per pump of the grease gun.
After confirming that you are at the right place with the right lubricant and know the right amount, remove the grease fitting cap (if it exists) and clean the grease fitting with a lint-free cloth or towel. Then, inspect the fitting for damage or wear. You can do this by simply pressing down on the BB to ensure it depresses and springs back quickly. If it is damaged, replace the fitting immediately before proceeding.
After determining the lube point is in good working order and ready to be lubricated, remove the purge plug and connect the grease gun’s coupling to the grease fitting. Do not hold the hose near the coupling due to the risk of injury. Manual grease guns can generate considerable pressure. If the hose fails, grease can penetrate most gloves and even your skin.
High-pressure injection wounds are serious injuries. If left untreated or when treatment is delayed, they can result in extensive medical procedures. If the coupling does not attach securely, it must be replaced.
Once everything is connected, you are ready to apply the grease. Slowly pump grease into the bearing. Each pump should take three to five seconds. Continue pumping until you reach the maximum volume of the regreasing amount or feel abnormal back pressure.
If you experience significant back pressure, the passageway may be blocked with caked thickener. Don’t try to force the grease into the equipment. This likely will result in either the coupling disengaging from the fitting or blowing a seal in the equipment.
Keep in mind that manual grease guns can produce pressures up to 15,000 pounds per square inch (psi), and lip seals can fail at 500 psi. If greasing an electric motor, you risk collapsing shields and getting grease into the windings. Any time you feel excessive back pressure, a corrective work order should be created and completed to resolve the issue before the equipment is regreased.
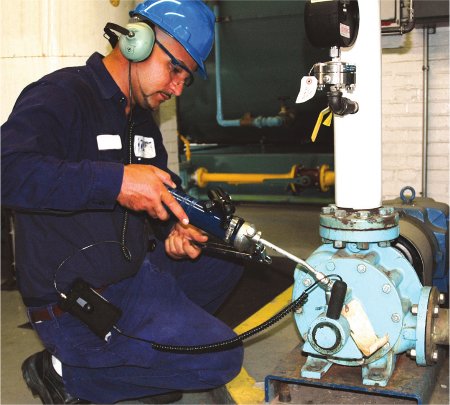
When using ultrasonic tools, listen to the machine before regreasing. If the equipment is within an acceptable decibel range, do not apply new grease. When adding grease, regrease until either the decibel level remains in range after applying small amounts of grease or you have applied the maximum amount of grease for a regreasing event. Stop when either of these two criteria have been met.
After the component has been properly regreased, disconnect the grease gun coupling from the equipment and clean the grease point. If the equipment has a grease cap, replace the cap on the grease fitting. If it doesn’t have a cap, place a small dollop of grease on the fitting. The dollop should be big enough to cover the entire grease fitting but not too large that it becomes a hinderance to clean later.
Finally, after you have completed regreasing, wait approximately 10-30 minutes before putting the purge plug back into the equipment. This will allow any excess grease to leave the grease cavity. Don’t worry if grease doesn’t purge out when you have applied the maximum amount of lubricant.
The most important thing to remember when storing or using your grease guns and lubricants is to keep all your lubrication equipment clean, cool and dry. This will help to maximize the longevity of your grease. Also, don’t forget to label everything, which is what I did when packing up my house.
Your team shouldn’t have to play hide-and-seek for the items they need, because they likely will just use whatever is readily available, and then you will be right back where you started.
