4 Steps to Diagnose Low System Pressure
Most hydraulic system failures can be classified as either a pressure problem or a volume problem. It normally is easy to tell which of these you are experiencing if you understand the difference between pressure and flow.
This critical concept was covered in my recent Machinery Lubrication article titled “Hydraulic Pressure vs. Flow: Understanding the Difference.” Armed with this knowledge, you can troubleshoot any system by simply eliminating the components that could not be causing the problem, isolating the components that could be causing the problem and then making checks of the possible culprits.
In my experience, once a pressure problem is encountered, the first component to be changed is the hydraulic pump. This frequently is a mistake. A common misconception is that pressure comes from the pump, thus making it the most likely suspect. Quite the contrary, while it is possible for the pump to be the cause of a pressure problem, it certainly isn’t the most likely cause. Usually, something else is faulty. The fastest way to determine the real cause while protecting the system from further damage is to use the following four essential steps.
1. Gather Information
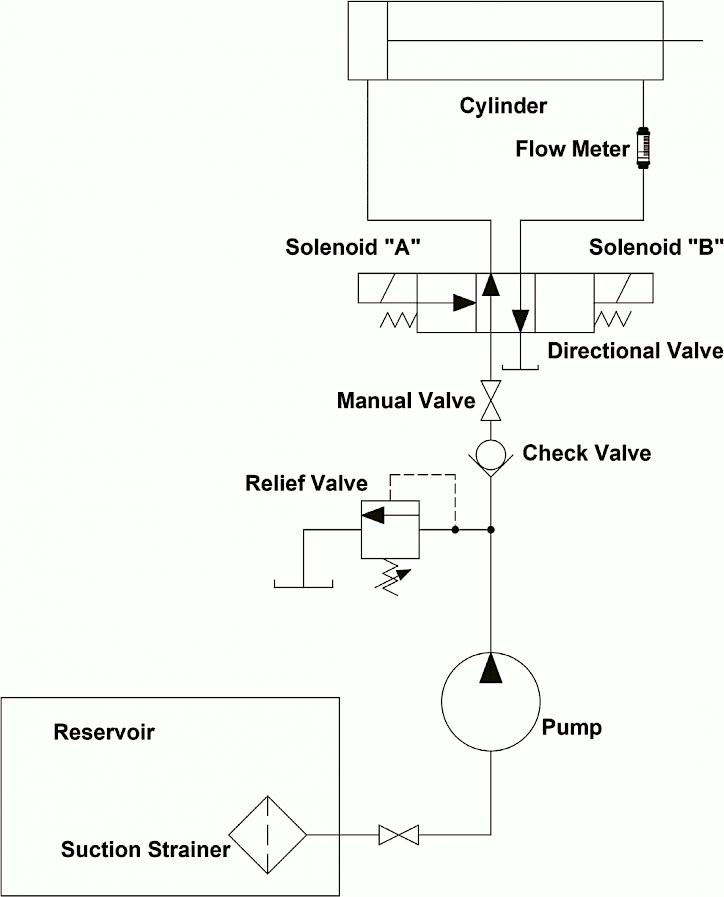
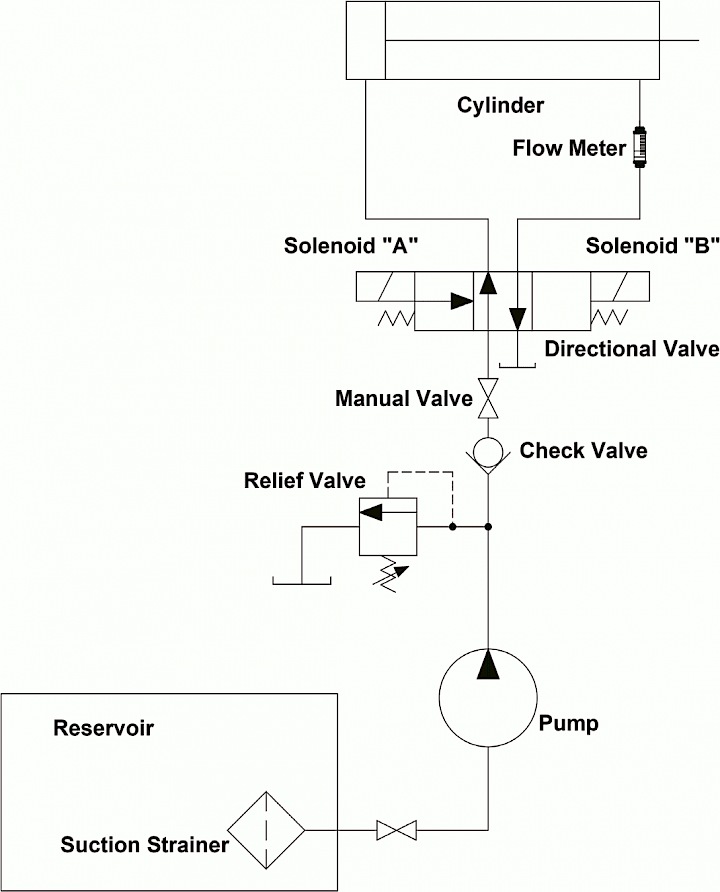
 This step is often skipped in the interest of saving time, but it is very important in troubleshooting. A lot of information can be gathered in a short period of time. The most critical piece of information is the system schematic. Use it to trace the flow through the system and determine which of your components could be causing the problem. A typical schematic containing components common to most systems is shown below.
You also will need to have a good understanding of the symptoms. Was the system working fine and then suddenly lost pressure, or did it happen gradually? Was it accompanied by a strange noise or an increase in temperature? If so, wherein the system did the sound or heat originate?
2. Isolate the Power Supply
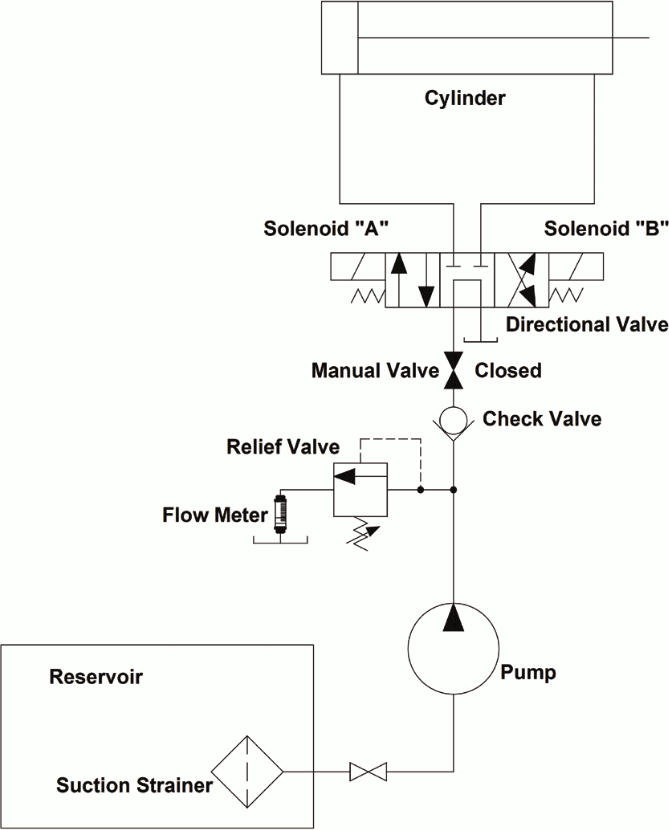
A well-designed system typically will have some way to isolate the power supply from the rest of the machine. A manual valve is commonly used, but it may be necessary to plug a line. In the example schematic, there is a manual valve between the system relief valve and the directional valve. Close it and see what, if anything, changes. This often can cut your troubleshooting time in half. For instance, if the pressure is low and nothing moves, but when the manual valve is closed, the pressure builds and the relief valve begins to dump, you know the power supply is working fine and the problem is somewhere downstream. By the same token, if nothing changes, obviously the problem is in the power supply.
3. Make the Easiest Checks First
Once you have traced the flow on the schematic, identified all the components that could cause a pressure problem and isolated the power supply to determine which part of the system has the problem, start making checks. List the suspect components in order of the easiest to the most difficult to check and make the easiest checks first. I have frequently seen people make the mistake of going immediately to the worst-case scenario, spending hours and large sums of money to replace very expensive components only to find that they were not the cause of the problem.
In almost every troubleshooting class I teach, someone relates a story of a time when they thought they had a major high-cost component failure but eventually found the problem to be a stuck check valve, hand valve that had been left open, blown fuse or some other simple thing that they had missed. Think back over your career. Isn’t it usually the simple things that fail? Try the easy checks first and work your way to the hardest. Even if it does turn out to be the big component, not much time will have been lost on the simple things.
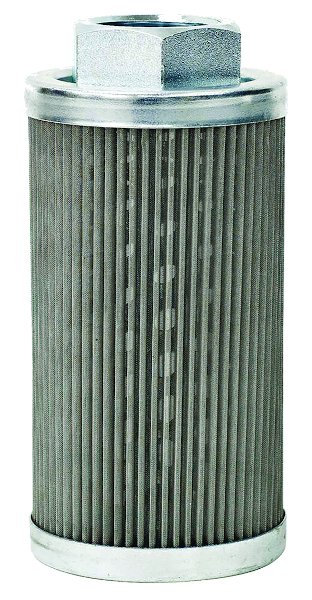
In the previous example, let’s assume no change in pressure was observed by isolating the power supply, suggesting one of the power supply components to be at fault. In this system, there is a suction strainer, pump and relief valve. Any of these components could cause a loss of pressure. Is there a whining sound? If so, perhaps the pump is cavitating. The most common cause of cavitation is a plugged suction strainer. The suction strainer typically is inside the reservoir, below the oil level, out of sight and out of mind. It isn’t checked or cleaned as regularly as it should be.
Of course, the pump cannot deliver more oil than it can take in, which can result in reduced flow. Sometimes the flow can be drastically reduced. This often will occur gradually with the increase in sound corresponding to reduced speed, but it can also happen suddenly if a large amount of sludge is stirred up by turbulence in the reservoir. Usually, it only takes a few minutes to check by pulling the suction line and inspecting the strainer. If it is blocked, it can be cleaned with compressed air.
If there is no whining sound, check the relief valve. With the system deadheaded, try to adjust the relief valve. If it will not adjust, chances are it could be stuck open. Bleed down any residual pressure, lockout the system and pull the relief valve. Look inside for trash, bent or broken springs, excessive wear, or anything that could keep it from seating properly. Pay particular attention to orifices.
In one case, the relief valve had been pulled and checked prior to my arrival. I was told that they had found two orifices, but both were clear. I asked that they pull it again so that I could check it myself before we eliminated it as the problem. Sure enough, there was a third orifice that they had not seen, and it had a small piece of debris, perhaps the size of a grain of sand, lodged inside. We cleaned the orifice, reassembled and reinstalled the relief valve, and the pressure came back up to normal.
The final possibility in the power supply is the pump. In the example system, a fixed-displacement pump is used. The best way to check this pump is through the system relief valve. Install a flow meter in the relief valve tank line. Sometimes, this is not possible due to the machine configuration. Perhaps the relief valve is attached directly to the reservoir or mounted in a manifold that is directly attached to the reservoir. In this case, install the flow meter in the pressure line of the pump.
If the hand valve is closed, deadheading the system, you know that any flow from the pump has only the flow path through the relief valve back to the tank. Turn the relief valve adjustment counterclockwise to a very low pressure. Some relief valves do not have a stop on their adjustment, so it may back all the way out. Adjust the valve counterclockwise until no spring resistance is felt.
When the system is turned on, the pump flow should dump across the relief valve at a very low pressure. Since there is no resistance to the pump flow, it will deliver all or nearly all its flow. Gradually increase the pressure setting of the relief. If the pump can maintain flow with the relief valve set at the normal system pressure, the pump is good. If, however, the flow drops as the pressure is increased, the pump should be replaced.
Suppose pressure built in the system when the hand valve was closed to isolate the power supply. Then you know the problem is downstream. Bypassing across the directional valve or across the cylinder is causing the pressure loss. In most systems, the directional valve would be an easier component to check first. Are the solenoids firing? Notice the tandem centre position. There will be no pressure in the system unless one of the solenoids is energized. Check for a magnetic field with a metal ruler or small screwdriver while each solenoid is energized.
A good way to test a directional valve for bypassing is to remove the lines from the manifold, cap off its “A” and “B” port lines and attach a hand pump with a gauge to the “P” port line. The “T” port can be run to a bucket so you can observe any oil that bypasses.
In the case of the example, notice the tandem centre position. Because of the tandem centre, you can only test the valve when it is in its “A” and “B” positions. Manually shift the valve to its “A” position, holding it shifted while operating the hand pump. Bring the pressure up near the normal system pressure and see if it holds. Try the same with the valve shifted to the “B” position. Pressure should hold for at least one minute with no bypassing to the tank. If pressure drops immediately, the valve is bad and must be replaced.
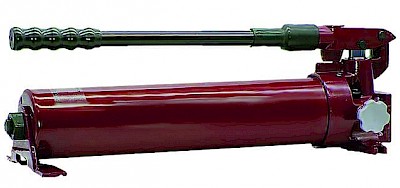
If the valve is good, test the cylinder. Remove any load from the cylinder. This may require disconnecting the rod from whatever it moves and may be time-consuming, which is the primary reason testing the cylinder should be last. Fully extend the cylinder, then shut down the system and bleed any pressure, leaving the cylinder extended. Install a flow meter in the cylinder’s road-side line. Power up the system and apply pressure to the full piston side of the cylinder. There should be no flow reading on the flow meter, and you should not be able to see the fluid moving inside.
4. Make Good Decisions
Use a logical progression of troubleshooting. Often, I see the “shotgun” method of simply changing parts until the problem goes away. This is wasteful not only in part costs but also downtime as well. Never remove a component unless you have good reason to believe it is bad. Whenever something is removed from the system, the lines are open to airborne contaminants. Contaminants much too small to see can do serious damage. While you may be fixing a problem today, you very well maybe adding more problems later.
